How to Create a Custom Service Toggle
It is not uncommon for organizations to run a common application on a non-standard TCP or UDP port. If an application or service is not represented within the default Service Control, it will need to be added through Custom Service creation.
To Create a custom service toggle, follow the below steps:
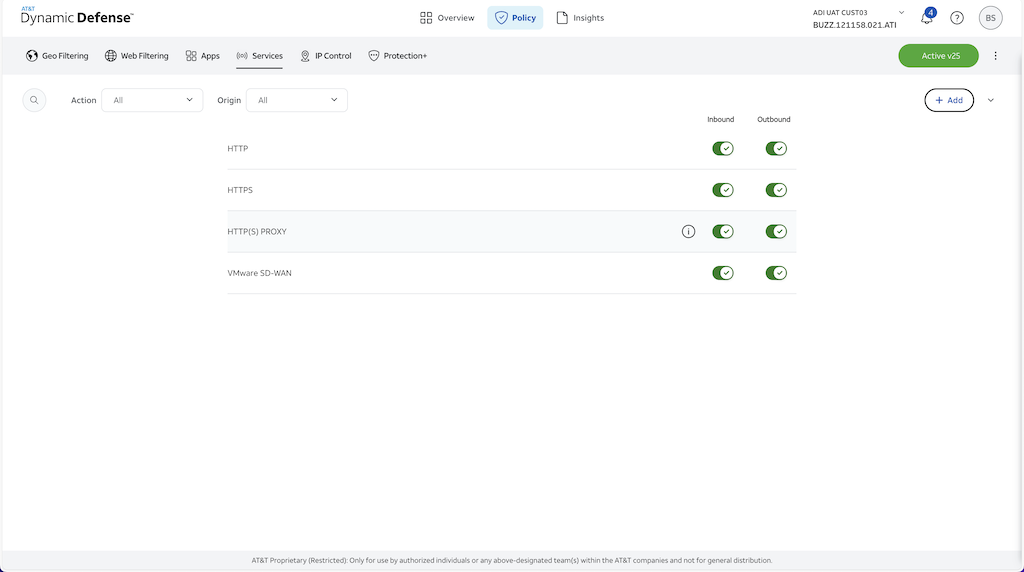
Navigate to the Services Module
Navigation: Policy > Services
Add Custom Service to Inventory
To begin adding your custom service, navigate to the body of the Service Inventory Module shown above.
Once here, click "Add" on the right side of the page
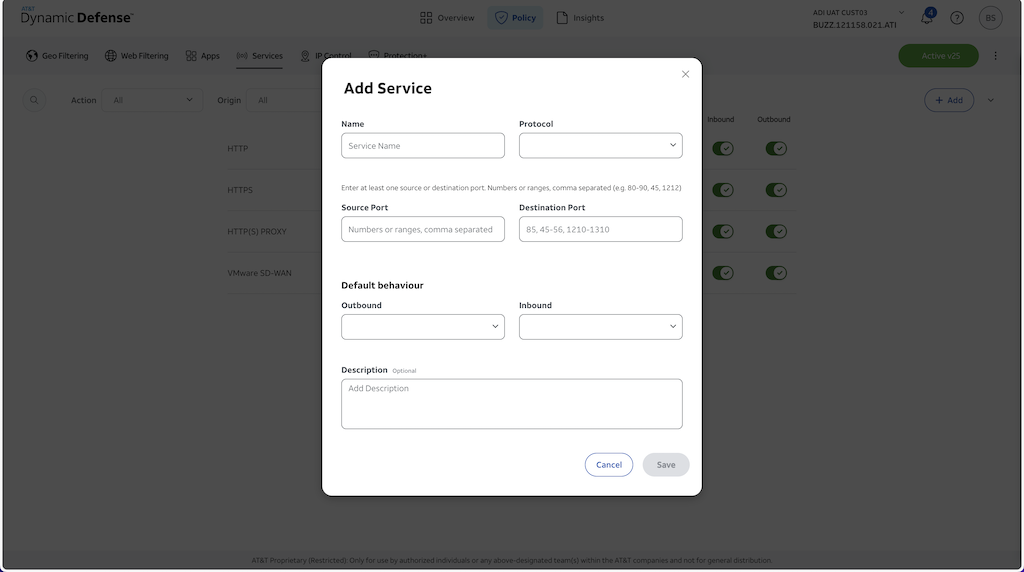
For each Service added, you will need to populate the following items within the UI:
- Name
- Protocol (TCP or UDP)
- Source or Destination Port
- Default Behavior (From My Network or From Internet)
- Description
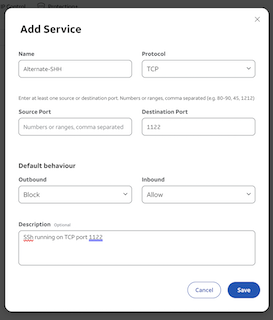
Example 1:
Lets assume you are running Linux servers on your network but would like to use port 1122 for your SSH service, rather than the standard port 22 for SSH.
To do this you would simply by clicking on "Add" at the right-hand side of the page
Provide a Service Name like "Alternate-SSH"
Select "TCP" for Protocol
Input "1122" in the Destination Port field
Decide your default behavior, this is what will populate in the Service Control Default View: Policy > Services > Filter by Custom Origin
In this case we would allow Traffic from the Internet and Block traffic From My Network
Lastly, provide a quick description of the Service as needed.
Click "Save"
After the Service is added, it should be reflected within the Services Module and you will be pushed into a draft state to confirm your Service add. To apply the Service add proceed to Step 3

Apply Your New Policy
Propagating configuration changes throughout the AT&T Dynamic Defense portal is a simple process.
Step 3a:
Making policy changes (e.g. adding, editing, or deleting policy rules) will be represented in a draft state shown on the right-hand side of the screen when the first policy edit is made. A draft will not be made active until you complete the remaining steps.

Step 3b:
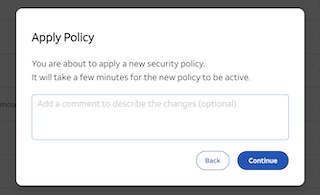
When ready to apply your new policy, move your mouse over the "Draft" button and click "Apply Policy" to activate the draft state. Activating the changes effectively pushes the configuration changes to the network embedded security to be applied across your AT&T Dedicated Internet connection.

A prompt will appear asking if you are sure you want to continue. Here you can add any notes about the new policy and then select "Continue" to activate the policy.
Step 3c:
After applying the policy, the Draft state will then convert into a Pending state as the policy is pushed over the network to be updated within the AT&T Dynamic Defense Service.

Step 3d:
Once the policy is successfully updated within the AT&T Dynamic Defense Service the status will then be updated to an active state and a new notification will be populated to show success.
